How to clean wicker furniture Tips:
Wicker furniture can either be made up of natural or synthetic materials. Both are strong, fashionable, and require high maintenance, though there are slightly few differences in how you do so.
Table of Contents
Clean wicker furniture made from a natural material
You already know that some of the natural materials used for wicker furniture are rattan, reed, or bamboo, but it does not really matter what material, natural wicker furniture is made of. The main point is that if it is natural, you should be more careful when cleaning it.
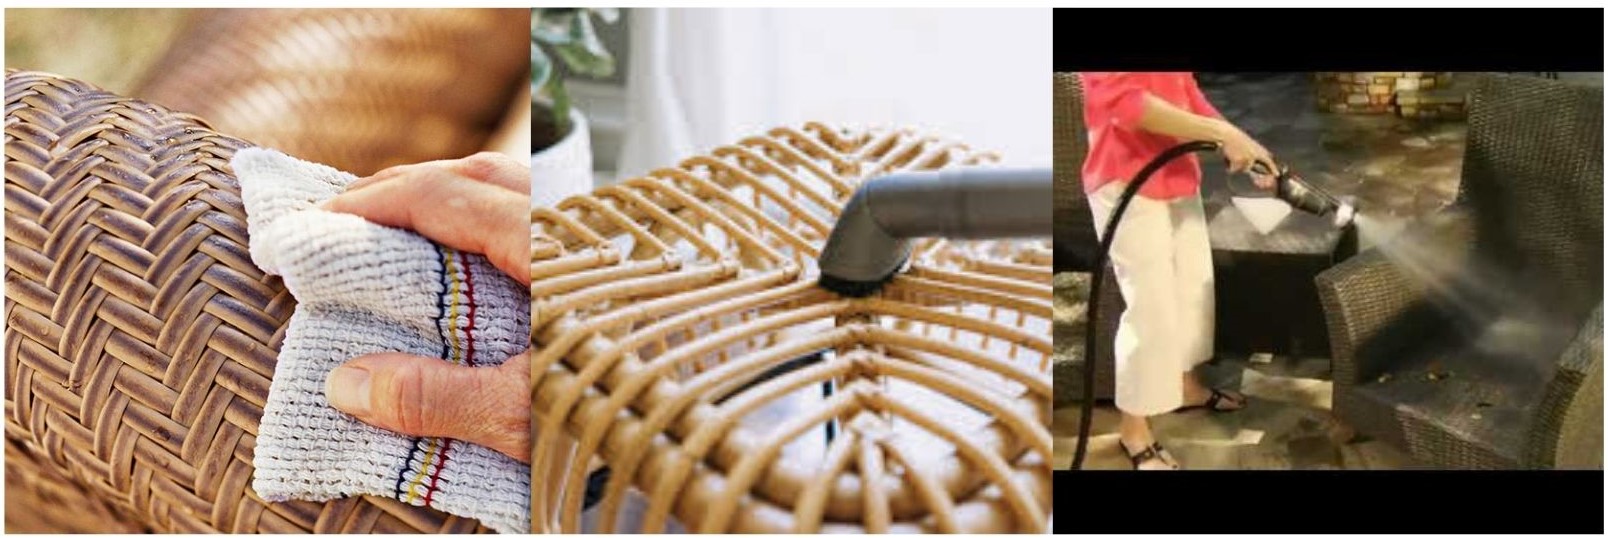
Using a soft brush attachment with bristles, gently brush away the dirt, dust, and pollen on your furniture. The goal in this step is to remove any accumulated dirt before you wash the furniture wet (as it will trap the dirt in the weaves), so do your best to remove any dust you would find.
It is understandable, though, that some of the dust stuck in between the tight weaves would be harder to remove, so you can go ahead and use a vacuum to make sure that no dirt would be left on the furniture.
Mildews are also not uncommon to wicker furniture, so you better check if there are ones that gathered while you are cleaning. You should apply to spray with a solution of 50% hydrogen peroxide and 50% water so that it would start to soak up.
After, you should make another solution of dishwashing soap and warm water. Using a sponge, you can directly apply the solution onto your wicker furniture to start cleaning it thoroughly. Keep in mind that you always have to be gentle with your hands.
It is best suggested that you let the solution trickle in between the layers of the weave of your wicker furniture so that you are sure that it gets cleaned completely. You should also see to it that the solution is applied greatly to all parts of your furniture.
Once you have seen to it that the soap has been applied well, you can rinse it out with a spray bottle with water. Hoses with nozzles are also allowed, as long as the nozzle is not in the jet set. You should always rinse out the soap on natural wicker furniture softly as not to ruin it.
To completely dry the wicker, gently dab it with a dry towel and leave it alone in a dry area for 24 hours. Then, you are free to make use of your wicker furniture again.
Clean Wicker Furniture made from the synthetic or manmade material
For the other type of wicker furniture, which would be the one made from synthetic material, you are not required to be as gentle as you did with the natural material.
Grab a soft-bristled brush, and start whisking away any signs of pollen, dirt, or dust that you would see on your furniture. You can also use a vacuum to thoroughly get rid of the dirt and to make sure it does not get trapped once you start washing your furniture with water.
A solution of dishwashing liquid and warm water is also necessary for synthetic wicker furniture. Use a sponge to clean the surface all throughout, and make sure that the solution will dribble down in between the weaves as well so that it will be cleaned meticulously.
Unlike natural wicker furniture, you do not have to use spray bottles to rinse the soap off. You can use your hose to get rid of the soap on your furniture. You can do it slightly harsher than what you can do to natural wicker furniture, too.
Let it dry alone in a dry area. After 24 hours, you can place your wicker furniture where it initially was and use it as well as new again.
- Always have it cleaned. It is no surprise that wicker furniture requires high maintenance, especially when in comparison to other regular furniture. Make sure that you never forget to clean your furniture at least once a month.
- Paint your wicker furniture. Paint helps in lengthening a material’s durability and endurance, whether it be wicker or not. It is a bonus that you could design your furniture with paint, too; feel free to make it white, retain the brown, or perhaps add a splash of pink.
- Apply oil to it. Tung oil contributes a lot of help in holding off the dampness of the wicker furniture. You can apply Tung oil with the use of a soft cloth.
- Cover your furniture. There are a lot of covers for wicker furniture available. This could protect your furniture from the harsh sunlight or jarring rains. You can have it custom-made, or you could buy one readily available in the market.
How to repair wicker furniture?
You might have thought of two things before deciding to repair your wicker furniture on your own—one is to have a professional fix it for you instead, and the second one being replacing your wicker furniture and not bother having it checked.
It’s a good thing you didn’t go with the two things you initially planned. Doing those would cost you extra legwork and money. It is already known that wicker furniture is extremely valuable, both in quality and price. Professionals who tend to wicker furniture are hard to find and contact, as well.
This is why fixing your wicker furniture yourself would be the best way to respond. You could also assess your situation at hand.
Check whether the damage is big or small. If it is the latter, then you are sure to do a DIY repair on your furniture. If you think that the damage is rather complex and you do not seem to understand it, then it is best that you take it to a repairman and have them fix it for you.
What to do with the loose wrapping on your wicker furniture’s legs
Loosening wrapping on wicker furniture – may it be a chair or a table, or anything else – are not uncommon, and most of them are easy fixes. You can have it function as well as new in four simple steps.
- Step 1. Check how much wicker strand your furniture might need. This would vary in regards to your loose wrapping, but have you should estimate the amount you need to tighten your wicker chair’s leg.
- Step 2. Cut the amount that you have estimated. Afterward, soak all of the lengths in water. This is to make the wicker caning more malleable and easier to bend when applying to the wicker chair leg.
- Step 3. Put a desirable amount of glue onto one of the wicker caning’s end, and carefully place it on the part of the wicker chair leg that you need to fix. You can secure its position with a tack.
- Step 4. Wrap the wicker caning around the leg meticulously so as you should make as minimal mistakes as possible. After you have successfully wrapped it, place another desirable amount of glue on its (other) end and place it carefully on the wicker chair leg. You can once again secure its position with a tack.
What to do if you find loose or damaged strands in your wicker furniture’s body
The steps are done with repairing a wicker furniture’s body goes the same with repairing one’s legs. It can function as good as new after being treated with four simple steps, as well.
Step 1. Assess the damaged body of your wicker furniture, and see how much wicker caning it may need. The estimated amount should be enough to use to repair your wicker furniture’s body.
Step 2. Cut the amount of wicker caning you have in mind and let it soak in water for 30 minutes so that it could be possible to bend when repairing the furniture body.
Step 3. Check whether the strands that you have with you have any ends that jut out and if so, carefully cut it with the use of a utility knife. If you can, you could also have the underside of an intersecting piece of strand glued.
Step 4. Check whether the wicker cane that you have glued has softened. Once it has, get the section that is rather longer than the replaced piece’s length and have it cut off. Go to the furniture body’s woven canes and put a slight amount of glue there, as well.
Step 5. Just beside the damaged cane, start weaving your new strand. This should follow the old strands of your wicker furniture’s body. You are allowed to utilize needle-nose pliers if you think that you need to.
Step 6. Double and carefully check if you are satisfied with the result of your new cane piece. Put it in place, and see if there are necessary strands that need to be cut off, such as extra canes. Underneath an intersecting piece, you can place the end of your strand.